First,
let’s make clear what is the different
between Wi-Fi
and ad-hoc network.
1.
Generally, to set up Ad Hoc networking, your main computer needs to have an
Ethernet based Internet connection as well as a Wireless (WLAN) network
adapter. But in the case of Virtual Wi-Fi, the Ethernet card is optional so you
can turn a laptop into a hotspot even if your laptop itself is connected to a
Wireless network and not to an Ethernet cable.
2. Computers
and other wireless devices in ad hoc networks must be within 30 feet of each
other but there’s no such restriction in the case of Virtual Wireless networks.
3. Ad-Hoc
wireless networking is available on Windows XP, Vista and Windows 7 while
Virtual WiFi, which is much easier to setup, is available on Windows 7 or
Windows Server 2008.
Second, let’s share the advantages and disadvantages of no-router
wireless network.
Advantage:
1. It is easy to setup with no additional
Software being needed
2. It's Free without purchasing any hub or
routers or service.
3. Nowadays, by default Wi-fi or Wireless
Card is included when you bought a computer especially in laptops.
4. It has strong portability and mobility
Disadvantage:
1. The computer that is connected to the
Internet (Gateway) must always be turned on. Unlike using a router, you can
turn off any computers in the network.
2. Wireless communication quality and the Data
safety performance are not so well as Bluetooth.
3. Its distance and range are limited.
Third, let’s come to the steps of creating no-router wireless network
1. Choose a computer to use as a router,
which must be operating for any other computers or devices to connect to the
network.
2. In the Control Panel, click on “Network
and sharing center”. Select “Set up a
connection or Network”.
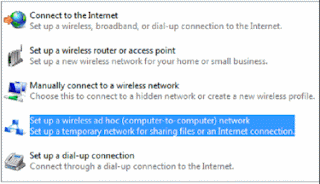
3. Choose “Set up a wireless ad-hoc
(computer-to-computer) network” and click on it. If the box is grayed out,
press "Advanced" in the "Wireless Networks" tab and choose
"Computer to computer (ad hoc) network."
4. Type a name for the network. Choose
whether to use a wireless network key or not.
5. Always remember to make the security
type “WPA-2 Personal”. Notify that this security type prevails over other types
since it enables genuine wireless network security.
6. Make sure you select “Save this network”
option else the ad hoc network will be removed if no other computers / devices
are connecting to the network.
(You can also choose your network type as
“WEP”. Give a preferred network name and chose the “Security type” as “WEP”.
The next step deals with providing a security key to the network to be built.)
7. Enable ICS on the router computer, which
will allow you to share your Internet connection.
Right click your Internet connection and
then choose "Advanced." Check the "Allow other network users to
connect through this computer's Internet connection" check box. Choose
"Wireless Network Connection" and press "OK."
8. Select the shared network from other
computers to connect. Right click the wireless networks icon in the
notification tray. Press "View Available Networks." Select the
appropriate network name and press "Connect."
Additionally, if you are on Windows 7, you
can instantly turn your computer into a personal Wi-Fi hotspot without
having to configure anything. All you need is the free software called Virtual
Router and the computer connected to the internet must be running Windows 7.
Referred link:
www.techtipsgeek.com/create-wireless-home-network-router-windows-7vista/5182/
Referred link:
www.techtipsgeek.com/create-wireless-home-network-router-windows-7vista/5182/


This comment has been removed by a blog administrator.
ReplyDeleteThanks for this post. It provides some great insight.
ReplyDeleteitach global cache uk
Thank you for such a very good tips. It will help a lot.
ReplyDeleteNetgear Router Tehnical Support
Thankyou
Lacy Brown